
Eduan - School, University & Online Education Next.js Template
Created : 9 Oct 2025
Last Update : 9 Oct 2025
By :
preoiT
Email : preoitinfo@gmail.com
Thank you for purchasing our **Eduan** - School, University &
Online Education Next.js Template
This document provides a comprehensive guide to setting up,
understanding, and customizing the template. It covers the file
structure, how to configure settings, work with components and
styles, manage state, deploy your project, and find support.
We've built this template using modern Next.js features (App
Router) and best practices to provide a performant and
developer-friendly experience.
If you have any questions or encounter any issues, please don't
hesitate to reach out for support.
Prerequisites
Before you begin working with the Eduan Next.js template, ensure you have the following software installed on your system:
- **Node.js**: We recommend using the latest LTS (Long Term Support) version of Node.js. You can download it from nodejs.org. Node.js includes npm (Node Package Manager).
-
**npm, yarn, or pnpm**: You will need a package manager to
install dependencies. npm is included with Node.js, but you can
also use yarn or pnpm.
- To install yarn:
npm install -g yarn - To install pnpm:
npm install -g pnpm
- To install yarn:
- **Code Editor**: A modern code editor like VS Code, Sublime Text, Atom, etc., is highly recommended for a better development experience.
- **Git (Recommended)**: Git is useful for version control and deploying to platforms like Vercel.
Installation
Follow these simple steps to get the template running on your local machine:
- **Unzip the main file**: Extract the contents of the downloaded template zip file to your desired directory.
-
**Navigate to the template directory**: Open your terminal or
command prompt and change the directory to the extracted
template folder (the one containing `package.json`).
cd path/to/your/eduan-template -
**Install dependencies**: Run the appropriate command based on
your preferred package manager (`npm`, `yarn`, or `pnpm`).
ornpm install
oryarn install
This will install all the necessary libraries and packages listed in the `package.json` file.pnpm install -
**Run the development server**: Start the local development
server.
ornpm run dev
oryarn devpnpm dev - **View the template**: Open your web browser and go to `http://localhost:3000` (or the address shown in your terminal). You should see the template running.
You are now ready to start customizing the template!
File Structure
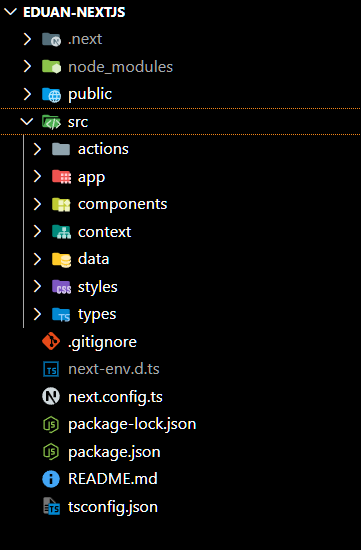
The template follows a standard Next.js App Router structure, making it easy to navigate and modify. All files are well-organized for developer convenience.
Root Directory:
After unzipping, you will find several files and folders in the root directory:
-
/src: This is the main source directory containing your application code. -
/public: This folder is for static assets like images, fonts, and favicons that need to be served directly. -
.gitignore: Specifies intentionally untracked files that Git should ignore. -
next-env.d.ts: TypeScript declaration file for Next.js environment variables. -
tsconfig.json: Configuration file for TypeScript. -
next.config.js: Next.js configuration file for advanced settings. -
package-lock.jsonoryarn.lockorpnpm-lock.yaml: Locks dependencies to specific versions. -
package.json: Lists project dependencies and available scripts. -
README.md: General information about the template (often includes basic setup).
Inside the /src Folder:
This is where the core of your application resides. Key subdirectories include:
-
/app: Contains all your pages and route-related files (following the App Router convention). -
/components: Houses reusable React components used across different pages or sections. -
/context: Contains files related to React Context API for state management. -
/data: Stores static data (like demo content) used in the template. -
/styles: Contains CSS and SCSS files for styling the template. -
/types: Defines TypeScript types and interfaces used throughout the project for type safety.
Understanding Key Folders:
-
**
/app**: This folder is central to Next.js App Router. Any folder created here defines a route. For instance,/app/about/page.tsxcreates the `/about` route. Thepage.tsxfile acts as the index page for a directory. -
**
/components**: Components here are modular pieces of UI. They are designed for reusability and can be modified here according to your needs. Components are imported and used within `app/` pages or other components. -
**
/public**: Static assets placed here are served from the root of your site (e.g.,/public/img/logo.pngis accessible at/img/logo.png). -
**
/data**: Theindex.tsfile in this folder is where you can find and modify the placeholder data used in the demo (e.g., list of courses, instructors, etc.). Updating this file will update the content displayed by the components that consume this data. -
**
/styles**: This folder contains all styling assets. You'll find your core SCSS files here, along with any included fonts or standard CSS files. -
**
/types**: Using TypeScript types defined here helps maintain consistency and type safety throughout the project, reducing potential errors during development.
Configuration
Beyond the initial installation, here are key areas you might want to configure:
Modifying Demo Data:
The template comes with demo data for elements like course lists,
testimonials, etc. This data is typically stored in the
/src/data/index.ts file. To use your own content,
simply edit the data arrays and objects within this file. Ensure
you maintain the expected data structure (types) as defined in the
/src/types folder.
Next.js Configuration:
The next.config.js file in the root directory allows
for advanced Next.js configuration, such as setting up redirects,
modifying headers, enabling experimental features, or configuring
image optimization domains. Refer to the official Next.js
documentation for full details on options available here.
Environment Variables:
For sensitive information or variables that change between
development and production environments (like API keys, database
URLs, etc.), use environment variables. Create a
.env.local file in the root directory of your
project. Variables defined here will be available in your Next.js
code. For client-side variables, they must be prefixed with
NEXT_PUBLIC_.
# Example .env.local file
NEXT_PUBLIC_API_URL=https://your-api-url.com/api
SECRET_KEY=your_secret_api_key # Server-side only
Access them in your code using
process.env.NEXT_PUBLIC_API_URL (client/server) or
process.env.SECRET_KEY (server-side only).
Components
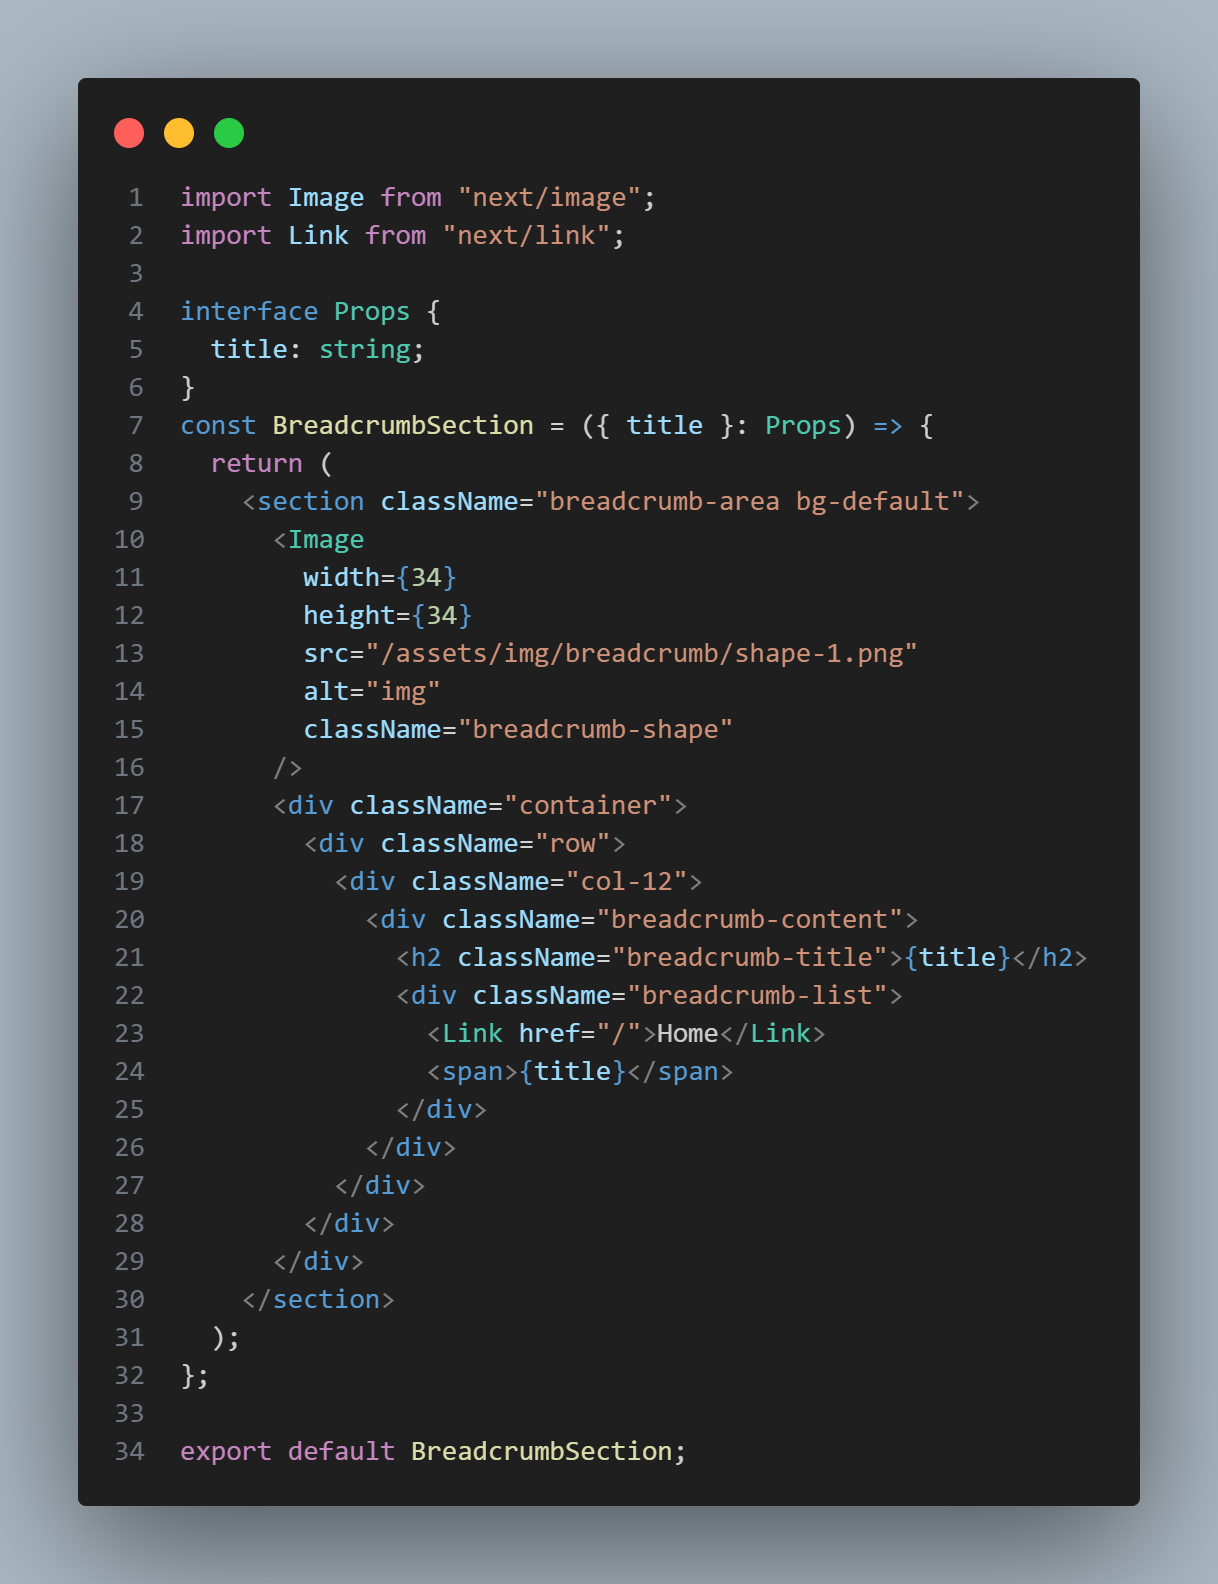
The template is built using reusable React components, organized
for clarity and maintainability in the
/src/components folder.
Components are typically organized into sub-folders based on their purpose or the section they belong to (e.g., `Header`, `Footer`, `Sections`, `UI`).
These components are then imported and assembled within the page
files located in the
/src/app directory. Many components accept `props` to
allow for dynamic content and configuration. Reviewing the
component files will show you which props are expected and how the
data from index.ts is consumed.
You can easily modify existing components or create new ones following the same structure.
SCSS Structure
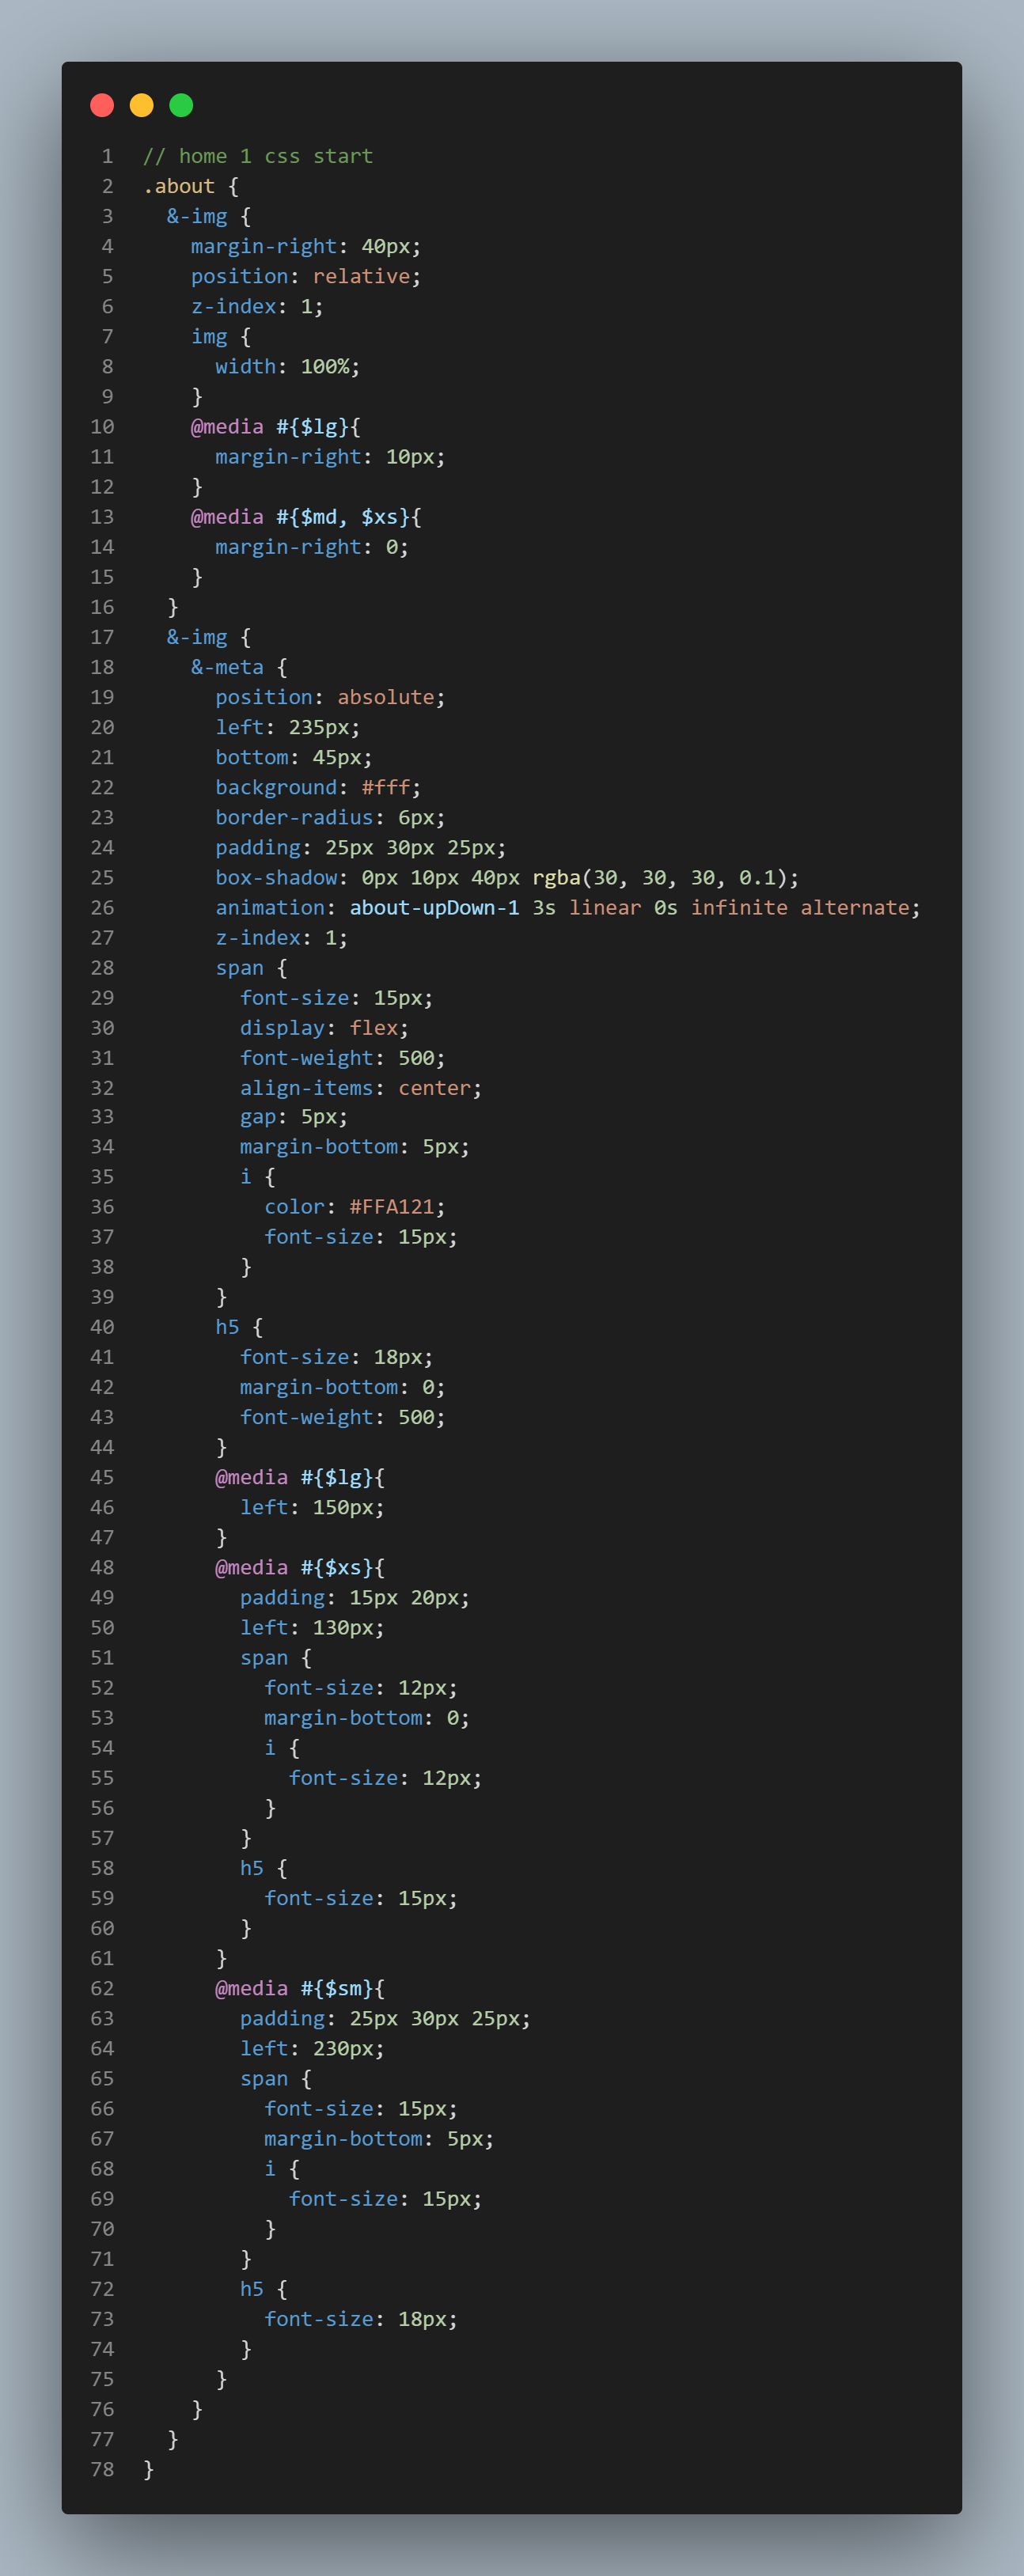
The template uses SCSS (Sass) for styling, providing features like
variables, nesting, mixins, and functions to write more
maintainable and organized CSS. The SCSS files are located in the
/src/styles folder.
The organization within the /scss sub-folder likely
follows a convention (e.g., 7-1 pattern, ITCSS) to structure
styles for different purposes (settings, tools, generic, elements,
objects, components, utilities).
- **Variables**: Look for files defining SCSS variables (e.g., for colors, fonts, spacing) to easily customize the template's appearance globally.
- **Mixins & Functions**: Reusable pieces of CSS logic.
- **Base/Generic Styles**: Resets, typography base styles.
- **Layout/Object Styles**: Styles for structural patterns.
- **Component Styles**: Specific styles for individual UI components.
- **Utility Classes**: Helper classes for common styles.
SCSS modules are typically imported directly into the components that use them, leveraging Next.js's built-in support for CSS Modules or global SCSS imports.
Context API
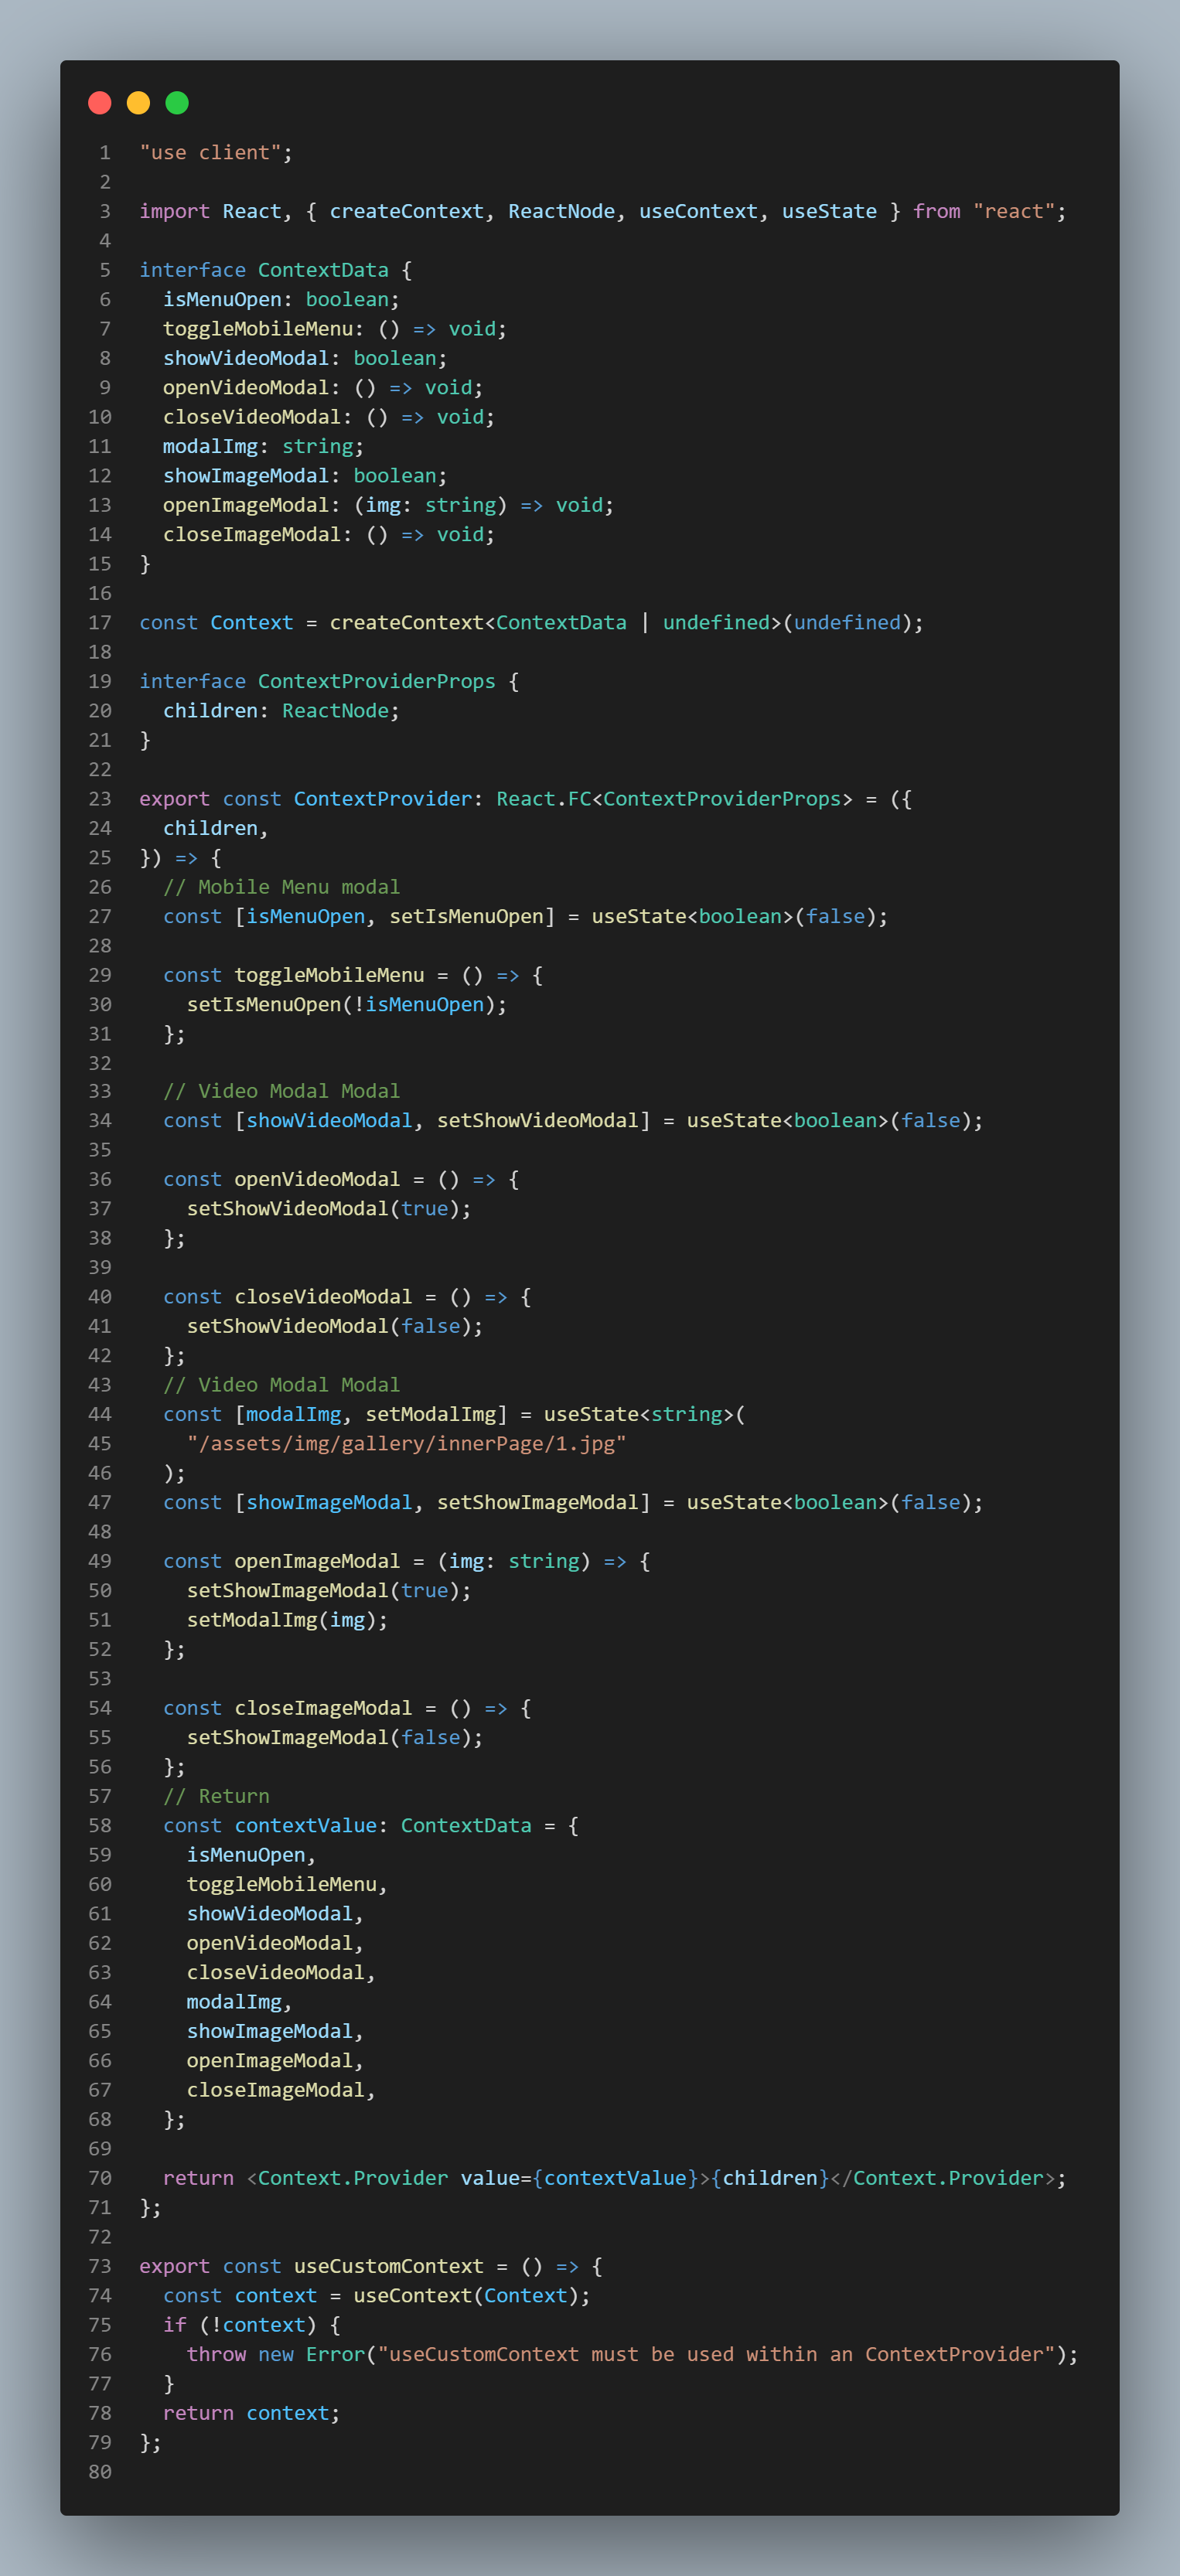
The template utilizes React's Context API, managed within the
/src/context folder (specifically
context.tsx), for global state management.
This approach helps avoid "prop drilling" (passing props down through many nested components) by making certain state values and functions available directly to any component that needs them, regardless of how deep they are in the component tree.
The context.tsx file contains the provider component
and defines the state and functions shared across the app. To
access this shared state or functions within any component, you'll
use a custom hook provided by the context, likely named
useCustomContext (as mentioned).
// Example of consuming context in a component
import { useCustomContext } from '@/context/context'; // Adjust import path if needed

const MyComponent = () => {
  const { sharedState, updateStateFunction } = useCustomContext();

  // Use sharedState and updateStateFunction here
  return (
    <div>
      <p>Shared State Value: {sharedState}</p>
      <button onClick={() => updateStateFunction('new value')}>Update State</button>
    </div>
  );
};
Review the context.tsx file for details on what state
is managed and the available functions. The functions are
documented within the file for your better understanding.
Pages Structure (App Router)
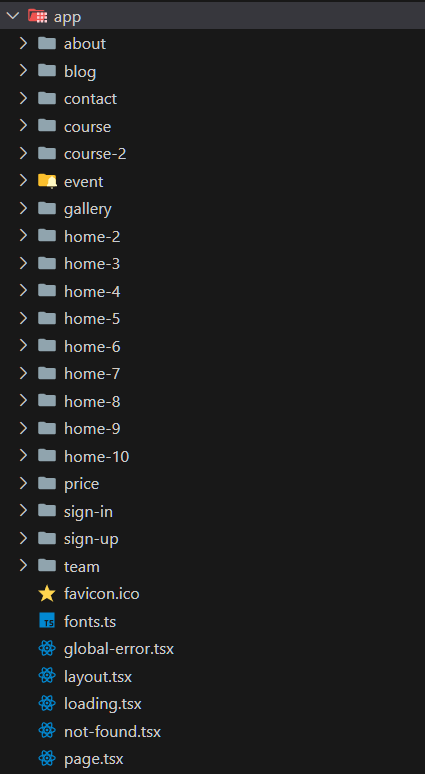
The /src/app directory uses Next.js's App Router,
which provides a file-system based routing mechanism.
To define a route, you create a folder inside the
/app directory. For example, creating a folder named
`about` (`/src/app/about`) will create the `/about` route.
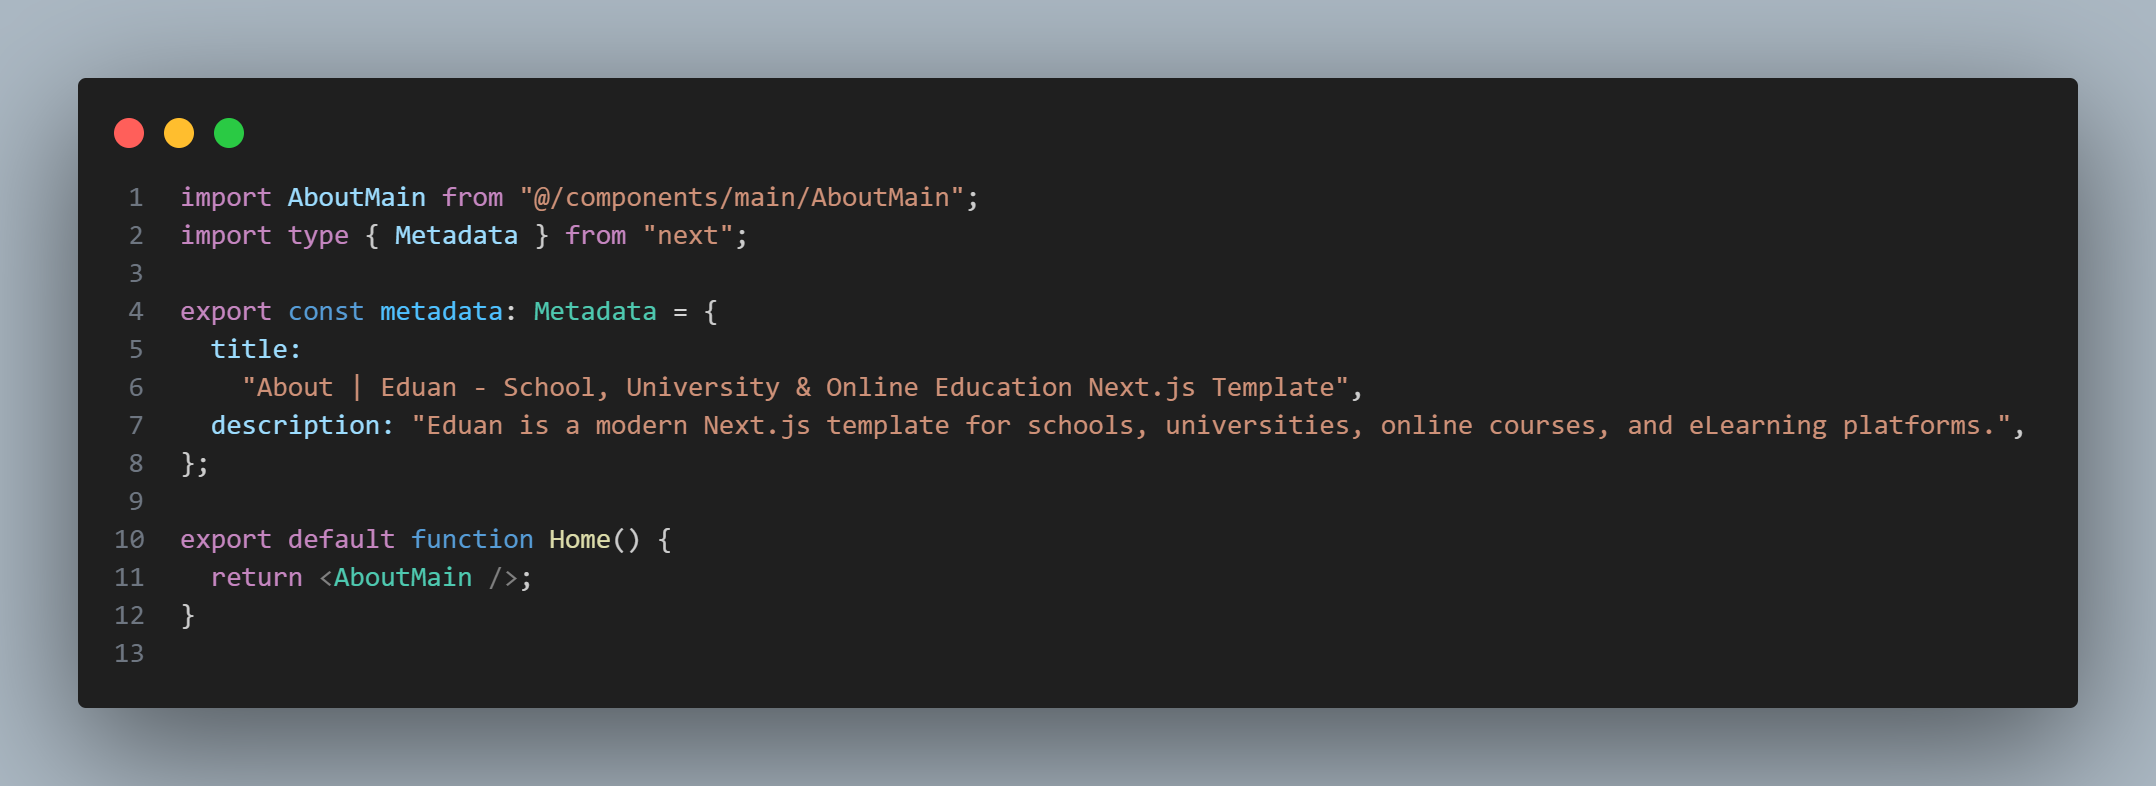
Inside a route folder, the `page.tsx` file acts as the index page for that route. So, `/src/app/about/page.tsx` handles the content for the `/about` URL.
This folder-based structure makes it intuitive to create nested routes as well (e.g., `/src/app/dashboard/settings/page.tsx` for the `/dashboard/settings` route).
Layouts and loading states can also be defined within this structure using `layout.tsx` and `loading.tsx` files, respectively, providing powerful control over UI rendering per route segment.
* Page-Level Component Returns a Single Main Component
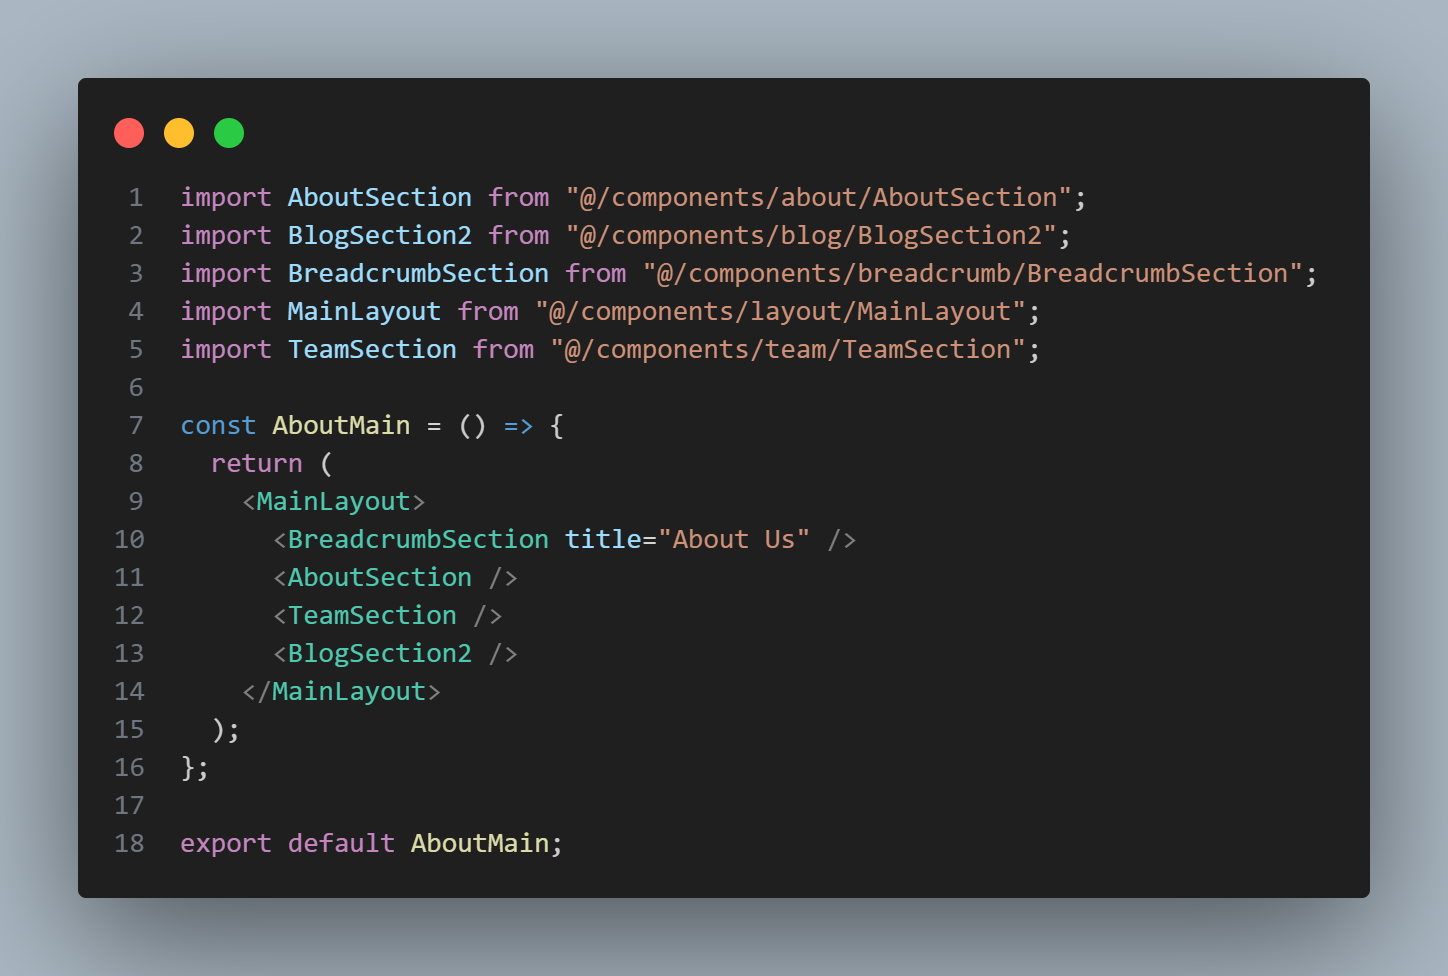
* Main Component That Combines All Page Sections as Reusable Components
Available Scripts
In the project directory, you can run the following standard Next.js scripts using your package manager:
-
npm run devoryarn devorpnpm devRuns the application in development mode with hot-reloading. Opens [http://localhost:3000](http://localhost:3000) by default.
-
npm run buildoryarn buildorpnpm buildBuilds the application for production to the
.nextfolder. Optimizes the build for the best performance. -
npm run startoryarn startorpnpm startStarts the production server. You must run
npm run buildfirst. Opens [http://localhost:3000](http://localhost:3000) by default. -
npm run lintoryarn lintorpnpm lintRuns ESLint to check for code quality and potential errors.
Consult the package.json file for any additional
custom scripts that might be included.
Customization
Here are some common customization tasks you might perform:
Colors and Typography:
The main color palette and typography settings are defined using
SCSS variables. Look for files like
/src/styles/scss/abstracts/_colors.scss (path may
vary slightly) to modify global color schemes, font families, font
sizes, etc.
Images and Assets:
Replace placeholder images (located in the
/public/assets/img folder) with your own assets.
Ensure images are optimized for web performance. For images used
within components, you can also place them elsewhere in
/public or import them directly into components
depending on Next.js Image component usage.
Content:
As mentioned in the
Configuration section,
modify the data in /src/data/index.ts to change the
content displayed in various sections like courses, testimonials,
etc.
Components:
Customize the structure and appearance of individual sections or
UI elements by editing the relevant component files in the
/src/components folder.
Styling:
Modify the SCSS files in /src/styles/scss to adjust
specific styles. Follow the existing SCSS structure and
methodology for consistency.
Deployment
Deploying your Next.js application is straightforward. Vercel, created by the creators of Next.js, is a popular and recommended hosting platform, but other options are available.
Deploying to Vercel (Recommended):
Follow these steps to deploy your template to Vercel:
- **Create a Vercel Account**: If you don't have one, sign up at https://vercel.com/signup. You can link your Git provider (GitHub, GitLab, Bitbucket) during signup or later.
- **Push Your Code to a Git Repository**: Ensure your template code is pushed to a new repository on your preferred Git hosting service (e.g., GitHub).
-
**Import Your Project in Vercel**:
- Go to your Vercel Dashboard.
- Click "Add New..." -> "Project".
- Select your Git provider and choose the repository where you pushed your Eduan template code.
- **Configure Project Settings**: Vercel should automatically detect that it's a Next.js project. You can usually leave the build and output settings as default. You can set the project name here. If you use environment variables (from your `.env.local`), add them in the "Environment Variables" section under Project Settings in Vercel.
- **Deploy**: Click the "Deploy" button. Vercel will build your project and deploy it. This may take a few moments.
- **Live Site**: Once the deployment is complete, Vercel will provide you with a URL where your site is live. You can configure a custom domain later in the project settings.
Vercel supports **Continuous Deployment**. Once set up, any changes you push to the linked Git branch (usually `main` or `master`) will automatically trigger a new build and deployment on Vercel.
Deploying to Other Platforms:
You can also deploy Next.js applications to other platforms like Netlify, AWS, or by running your own Node.js server.
- **Netlify**: Similar to Vercel, link your Git repository. Netlify will detect the Next.js project. Build command is usually `npm run build`, and publish directory is `.next`.
- **Manual Deployment**: Run `npm run build` on your server to create the production build. Then, run `npm run start` to serve the application. You might need process managers like PM2 or forever to keep the process running.
For the most up-to-date and detailed deployment instructions, please refer to the official Next.js Deployment Documentation.
Sources & Credits
This template utilizes the following libraries, fonts, and assets:
-
Fonts:
- Roboto (Google Fonts)
- Sansita Swashed (Google Fonts)
- Any other fonts included in `/public/fonts` or `/src/styles/fonts`.
-
Icons:
- Font Awesome
- Any custom SVG icons included in the template.
- CSS Framework:
-
React Libraries & Dependencies:
- Next.js
- React
- Swiperjs (For carousels/sliders)
- React Select (For enhanced dropdowns)
- State Management:
-
Images:
- Placeholder images.
Support
Thank you for choosing our Eduan template! We strive to provide high-quality products and support.
If you have carefully read through this documentation and still have questions, encounter bugs, or need assistance with specific issues related to the template's code and features as advertised, please reach out to us via the ThemeForest support channel.
You can contact us through our profile page: preoiT on ThemeForest.
We aim to provide timely and helpful support to ensure you have a smooth experience using our template.